We warned you, José. In our first edition of Coping without Kane, we suggested that not using an out-and-out (Carlos Vinícius, heard of him?) striker would not work, and that was precisely what went down as Tottenham Hotspur faced Brighton and Hove Albion.
The Seagulls emerged deservedly victorious at home for the first time this season, with the xG Gods finally delivering some justice to both sides. In this analysis, we will take a look at the issues Tottenham faced without their star striker Harry Kane, who is set to be out for a few more weeks.
Line-ups

Brighton deployed their recognisable 3-4-2-1, with Robert Sánchez continuing in goal. Ben White, Lewis Dunk and Adam Webster made up the defence, with Joël Veltman and Solly March on either side. Pascal Groß joined Yves Bissouma in midfield, with Leandro Trossard and Alexis MacAllister further forward. Neal Maupay spearheaded the attack.
Mourinho persisted with a back-three despite its failure in the last match, as Hugo Lloris kept his spot in goal. Davinson Sánchez was the new man in the defence, and he joined Toby Alderweireld and Joe Rodon.
This meant that Ben Davies was pushed out to left wing-back, with Moussa Sissoko on the other side. Once again, Tanguy Ndombele was partnered by Pierre-Emile Højbjerg in the middle of the park, while Son Heung-min and Gareth Bale took a spot on either wing. Steven Bergwijn led the line.
Tottenham in possession in the first-half
WIth 56.8% of the ball in this match, Tottenham certainly had the possession to hurt Brighton. The trouble was, though, that they were not able to seriously threaten Brighton’s defence at any point. Let’s see why:
Spurs had two build-up variations, so let’s go over them:

Usually, Tottenham built up with a 3-4, as the wing-backs pushed forward while holding their width.

The other option saw Højbjerg drop closer to the back-three, while Ndombele pushed forward from midfield. Therefore, this was a sort of a 3-1-3, which was mostly used when Tottenham quickly recovered possession with most of their team in the Brighton half, usually after a failed counterattack from the hosts or successful counter-press (which was quite rare).

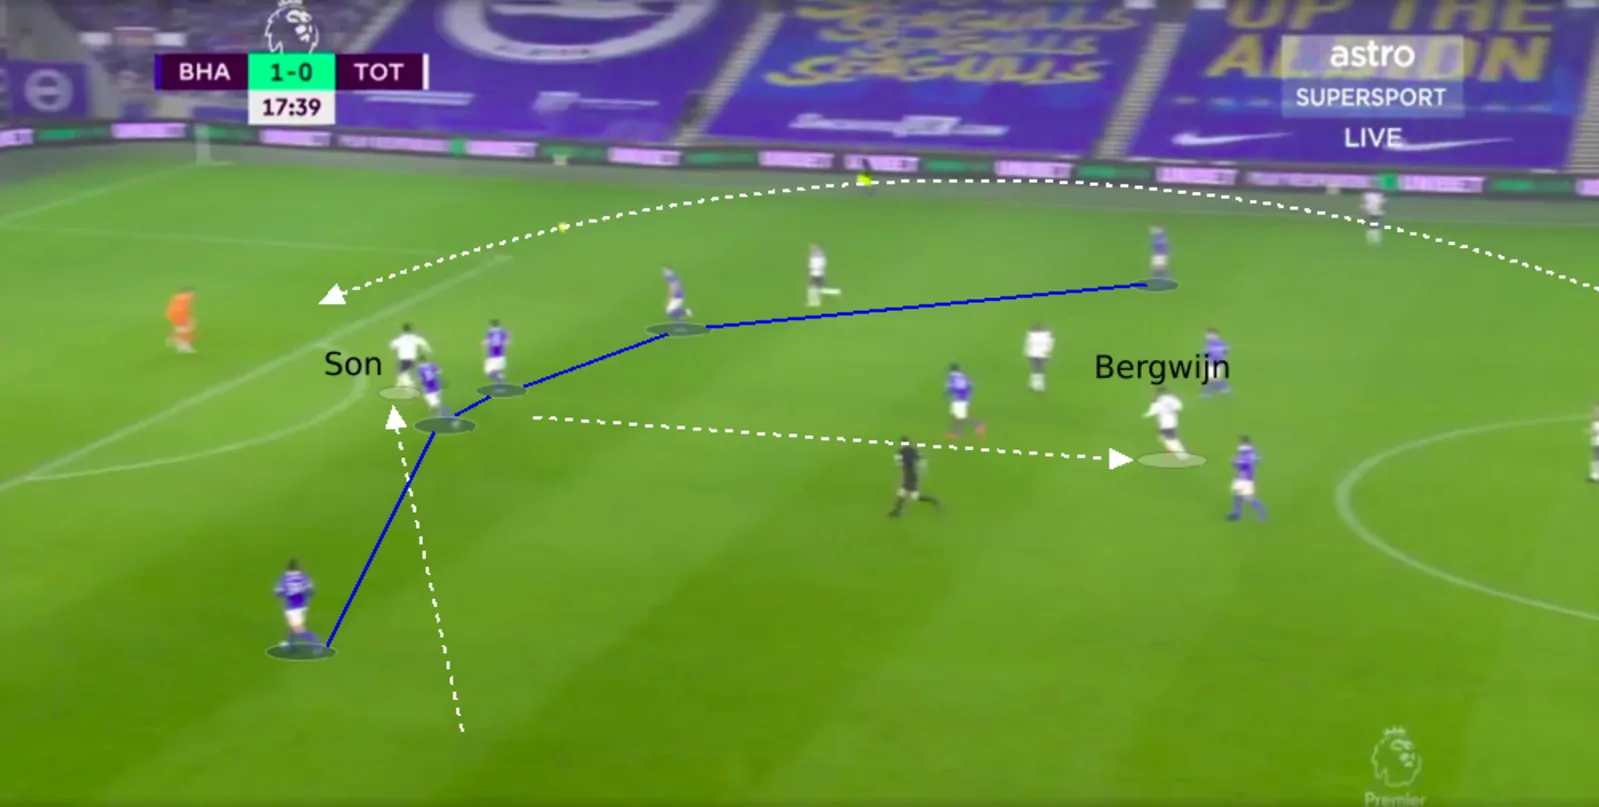
Like Kane, Bergwijn often looked to drop deep from centre-forward, trying to pull the Brighton backline out of shape and create space for the two Tottenham wingers to run into. With this done, one of the defenders would send a long ball up the pitch, hoping to find Son, who would make the run forward to occupy the space that his teammate vacated.
However, the issue here was that Bergwijn could not pull the Brighton defence out of shape. He moved back so deep that he entered the Brighton midfield, with the fact that their lines were compact in the first place further helping that. So, as you will see next, the Seagulls’ midfielders dealt with Bergwijn.

The Dutchman exchanged positions with Son quite often too, with the idea once again being to cause some confusion in the Brighton defence. However, as you can see above, the home side had absolutely no problem with this, as they dispatched one of their midfielders from their 5-3-2 out of possession to go and deal with Bergwijn.

In this average positions map, you can clearly see that Bergwijn is deeper than Bale and Son (who is furthest forward), so the attempt to use him as a false-nine was obvious – and a failure.
Defensive issues
With an xGA of 6.6 in their five Premier League matches in January (including this one), Tottenham’s defence has been less-than-stable. Brighton exploited some of these defensive issues brilliantly, especially in the first half.

Tottenham didn’t press with any real intent, but their 2-3 did ensure that Brighton could not play through them centrally.

In their own half, Tottenham dropped into a 5-2-3 as the wing-backs joined the defensive line.
In the last match, Liverpool targeted the space in between Joe Rodon (who was on the right of the back-three) and the right wing-back. Brighton did something similar, but on the opposite flank since Rodon’s position was switched.

Using Veltman to pull Davies wide and Trossard to pull Rodon away from the defensive line, Brighton opened up a healthy amount of space in between the Tottenham defensive duo for White to feed through balls into.

The goal came from this exact gap. On this occasion, it was Groß pulling Davies wide immediately after a set-piece clearance was recovered by Brighton.

With Højbjerg having to rush forward to meet MacAllister, who had the ball, the gap between Davies and Rodon was left completely exposed, and that is precisely where Groß went.
With the majority of their attacks coming from their right side, it was clear that Brighton were targetting this weakness. They successfully exploited it too, creating multiple chances and finally, finally putting one past the keeper and into the net. Graham Potter must have been pleased at half-time.
Second-half changes
With a totally poor first-half performance and a deficit to overcome, Mourinho knew that some things had to change at half-time once again, and they did with Carlos Vinícius replacing Sánchez.

With that, Spurs switched to a back-four for the second time in two second halves. Vinícius led the attack with Bergwijn behind him, while Son and Bale stayed on the left and right respectively. With the midfield double-pivot also untouched, Tottenham’s new formation was a 4-2-3-1.

Now, Tottenham built up with a 2-4, as the two full-backs pushed up as they previously did. The difference here was that they had an extra man ahead, so in possession, Spurs had a 2-4-1-3 instead of a 3-4-3.
However, as is also depicted in that image, Brighton sat deeper in their 5-3-2 shape, minimising the space between their lines and also ensuring that there were no expanses of grass in behind the defence.
Mourinho replaced Bale with Lucas Moura and Ndombele with Erik Lamela later on. The first substitution was a like-for-like change, but the second did necessitate a switch in formation.

Now, Tottenham switched into a 4-1-4-1, as Højbjerg was left alone in holding midfield, with Lamela pushing forward alongside Bergwijn in attacking midfield. In possession, this looked like a 2-3-2-3, once again thanks to the advancing full-backs.
But, despite all of these changes, Tottenham could only manage 18 touches in the Brighton penalty area throughout the match, as Potter’s 5-3-2 proved to be a simple spell but quite unbreakable.
Conclusion
Disappointment continues for a Kane-less Tottenham, who have accumulated a meagre 0.50 xG since their star striker went off injured at half-time against Liverpool. Bergwijn as a false-nine clearly did not work, while Bale looked poor once again with just 30 touches and no shots or key passes. Mourinho has switched systems at half-time in each of his last two games, which surely cannot be a good sign.
The troubling times at Tottenham are continuing, and with an 11 point deficit to leaders Manchester City, the top-four race should be more concerning than a title-fight, because the latter seems very much out of reach. Given how tight this season has been, Mourinho will need to find solutions within a week now if Spurs are to stay in the hunt for even a Champions League spot.
Stats courtesy Fbref.com and Whoscored.com.
Add Sportslens to your Google News Feed!