After all the drama around the European Super League, Europe’s biggest clubs had to get back to the Champions League, which was in its semi-final stage.
The first clash of the round saw Real Madrid host Chelsea at the Alfredo Di Stéfano Stadium, with Thomas Tuchel and Zinedine Zidane meeting for the fifth time in their careers.
After multiple recent slip-ups, the hosts were second in La Liga and had Barcelona just behind them with a game in hand, so their title chances were very much beyond their control.
Having failed to win any cup competitions either, the Champions League perhaps was their most clear shot at silverware in this campaign, which is why this was a crucial clash for them.
Chelsea had broken into the Premier League‘s top four and created a bit of a gap there following a superb run of form under Tuchel, which also saw them knock Manchester City out of the FA Cup en route to the final.
Reaching the Champions League final for just the second time in their history would make the appointment of the German manager a massive success in just half a season, so this was a key match for them.
The Blues got off to a great start as they took the lead just 14 minutes in, but Madrid quickly responded as they made it 1-1 before the half-hour mark.
An intriguing strategic battle ensued throughout the match, but there were no more goals as the two sides settled for a draw in Spain. In this analysis, we will take a deeper dive at some of the tactics employed by both sides in this Champions League semi-final.
Real Madrid in possession
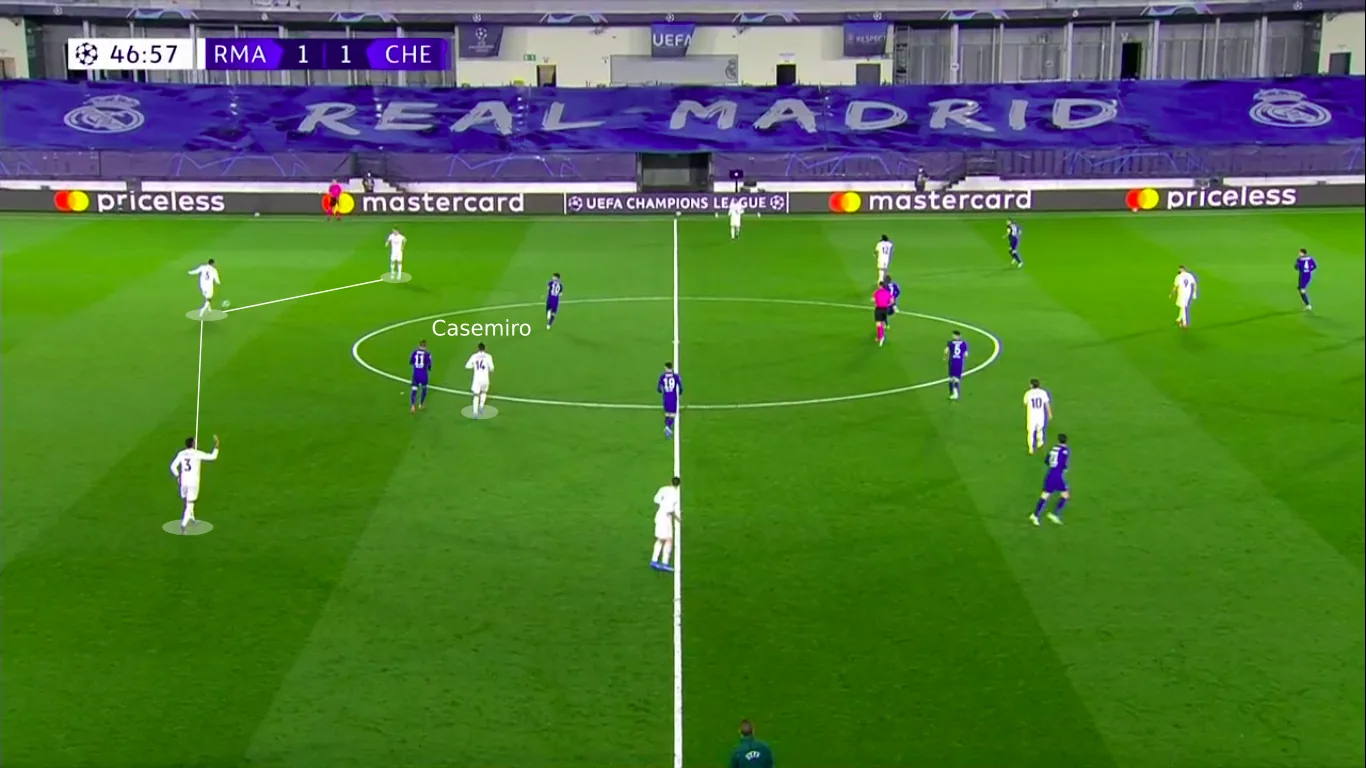
Zidane made some intriguing tactical decisions in his line-up as he went for a back-three, which featured some very interesting positional rotations in possession.
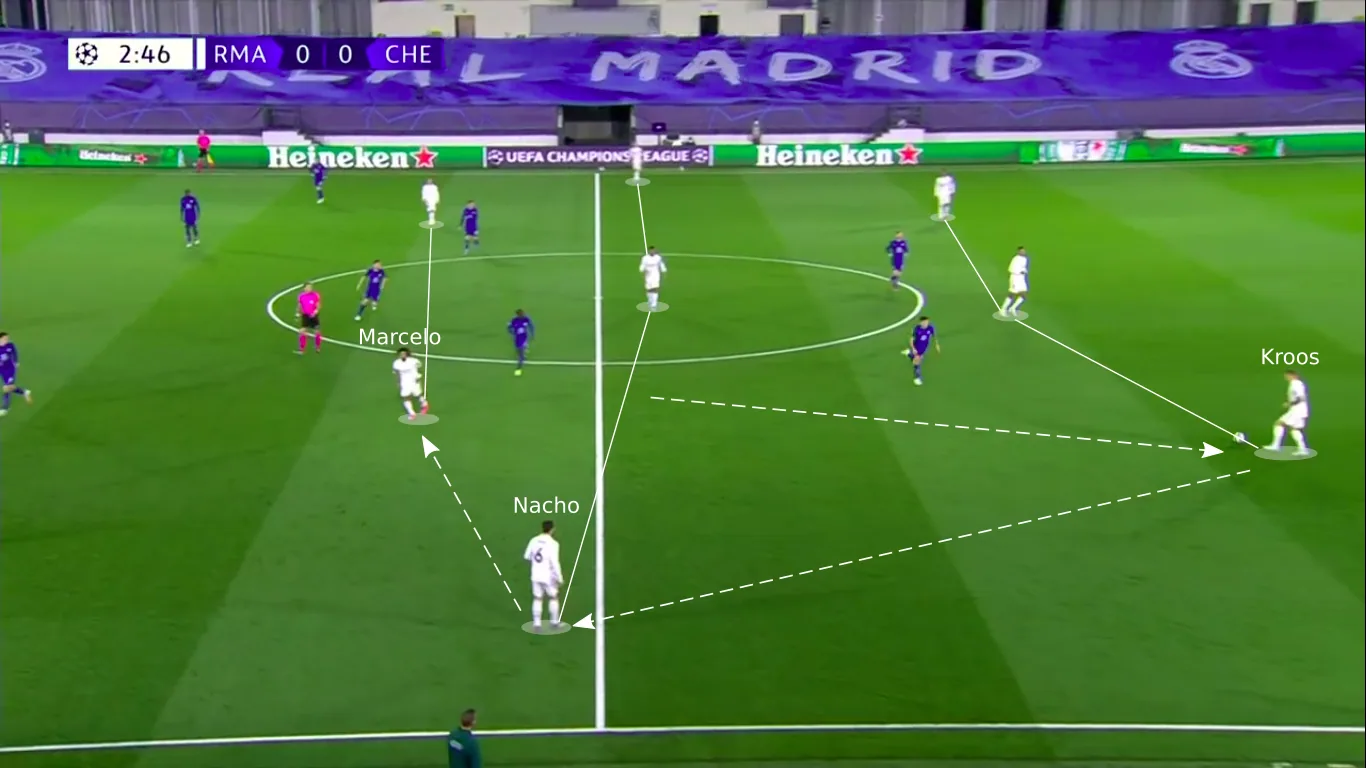
Their shape largely remained unchanged – moving from a 3-5-2 to a 3-3-2-2 at best, but there was a lot of movement on the left flank. Toni Kroos dropped into the left centre-back position, freeing up Nacho to drift out to the left. This caused Marcelo to move, and he went central in an inverted attacking midfielder role alongside Luka Modrić.
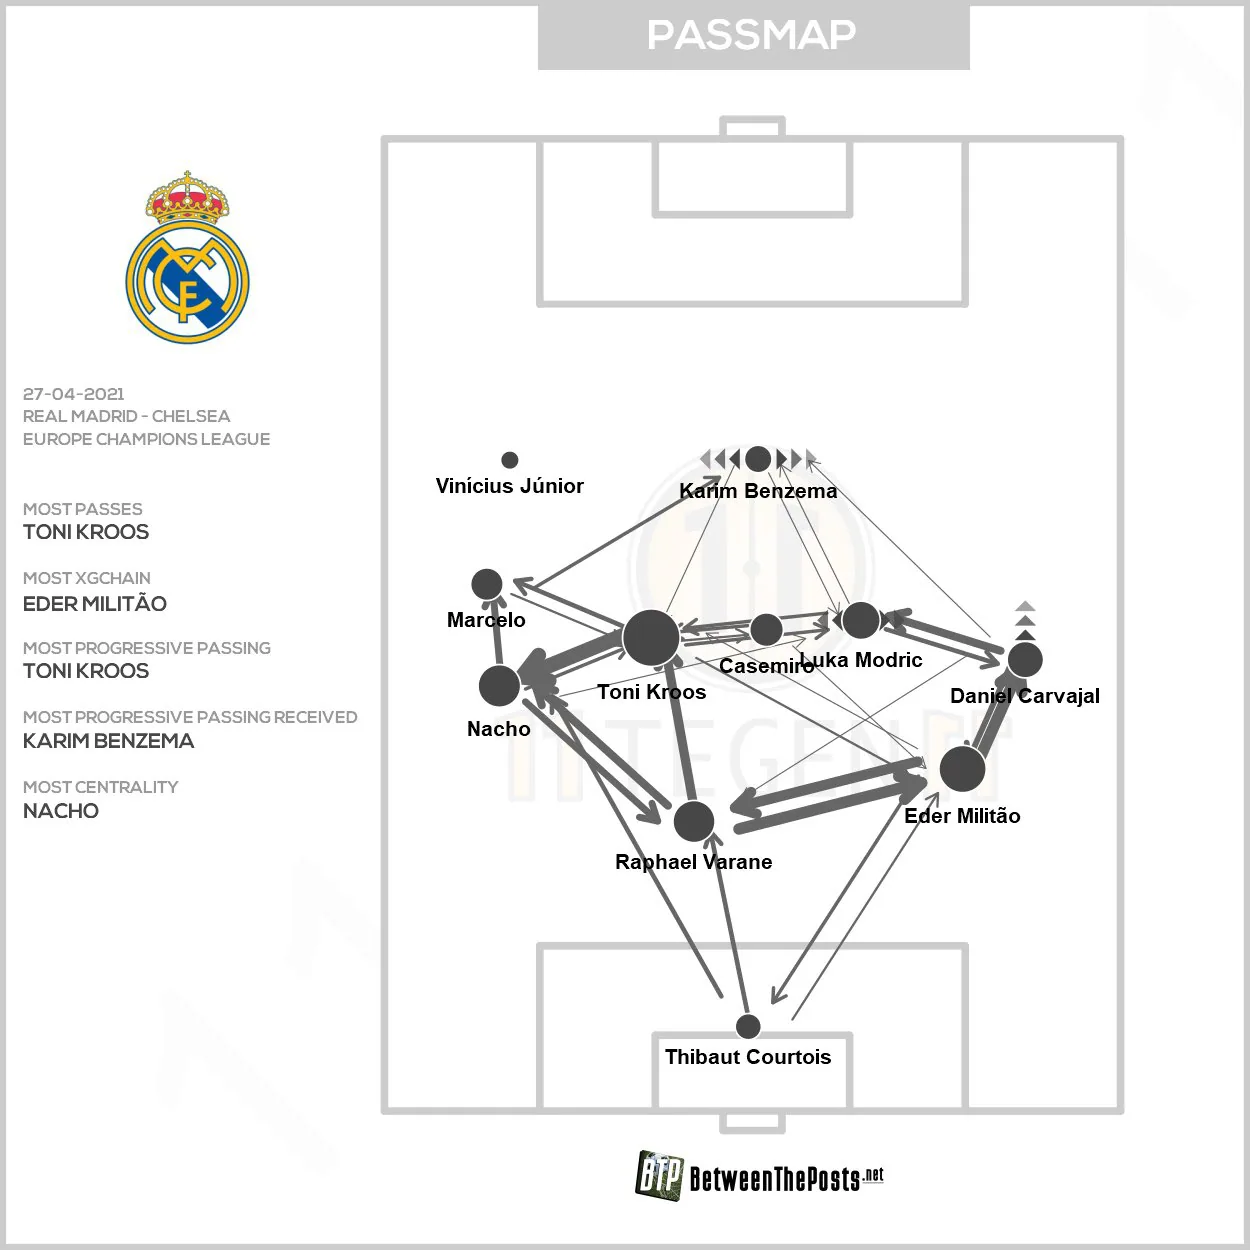
As this passmap shows, Toni Kroos was the key player in Madrid’s system, as he managed more touches than any other player on the pitch (113), the most passes (92) and completed more progressive passes than any of his teammates.
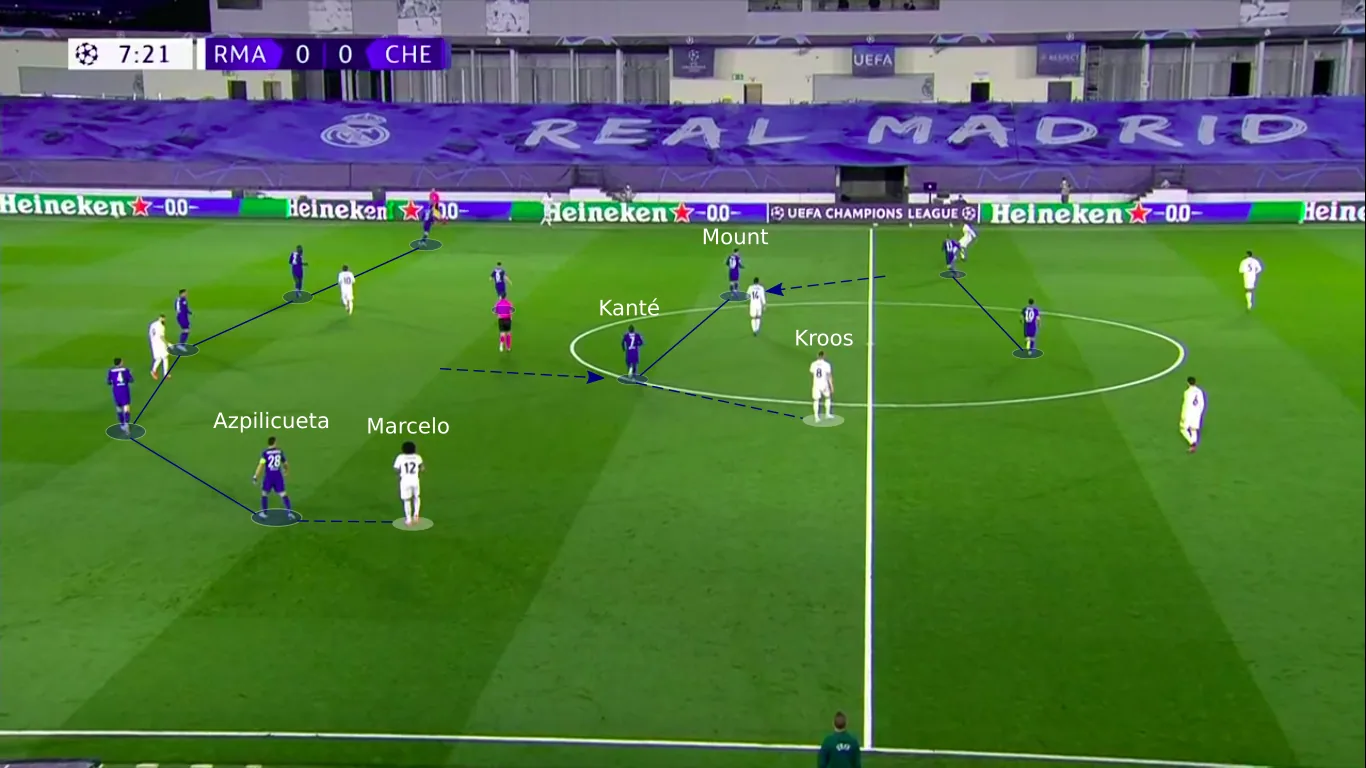
Chelsea countered this by defending in a lopsided 5-1-2-2. They did not really press high up the pitch, instead opting to deploy a mid-block with Timo Werner and Christian Pulisic at the sharp end.
Mason Mount dropped off the front line, while N’Golo Kanté pushed further up than Jorginho to mark Kroos if he ventured into the midfield. The back-five remained quite positionally disciplined, although César Azpilicueta departed from it quite often as he was tasked with man-marking Marcelo.
Real Madrid’s reliance on Benzema
For all of the possession they had, Real Madrid offered very little in terms of goal threat. Chelsea’s defensive shape was obviously quite successful in thwarting them, but their system did not help much either.
Going back to the pass map, another interesting conclusion that can be drawn is how isolated Vinícius Júnior was on the left. He got just 22 touches in the match, getting dispossessed twice and only completing one dribble without ever managing a single shot.
That should explain why he was brought off for Eden Hazard in the 66th minute, but the ex-Chelsea man could not do much better with just 12 touches and a row of zeroes in terms of shots, chances created, dribbles and fouls drawn.
All of this left a lot of weight on Karim Benzema’s shoulders as he was really the only functional member of the front two, but he did not shirk away, responding emphatically as he has done all season.
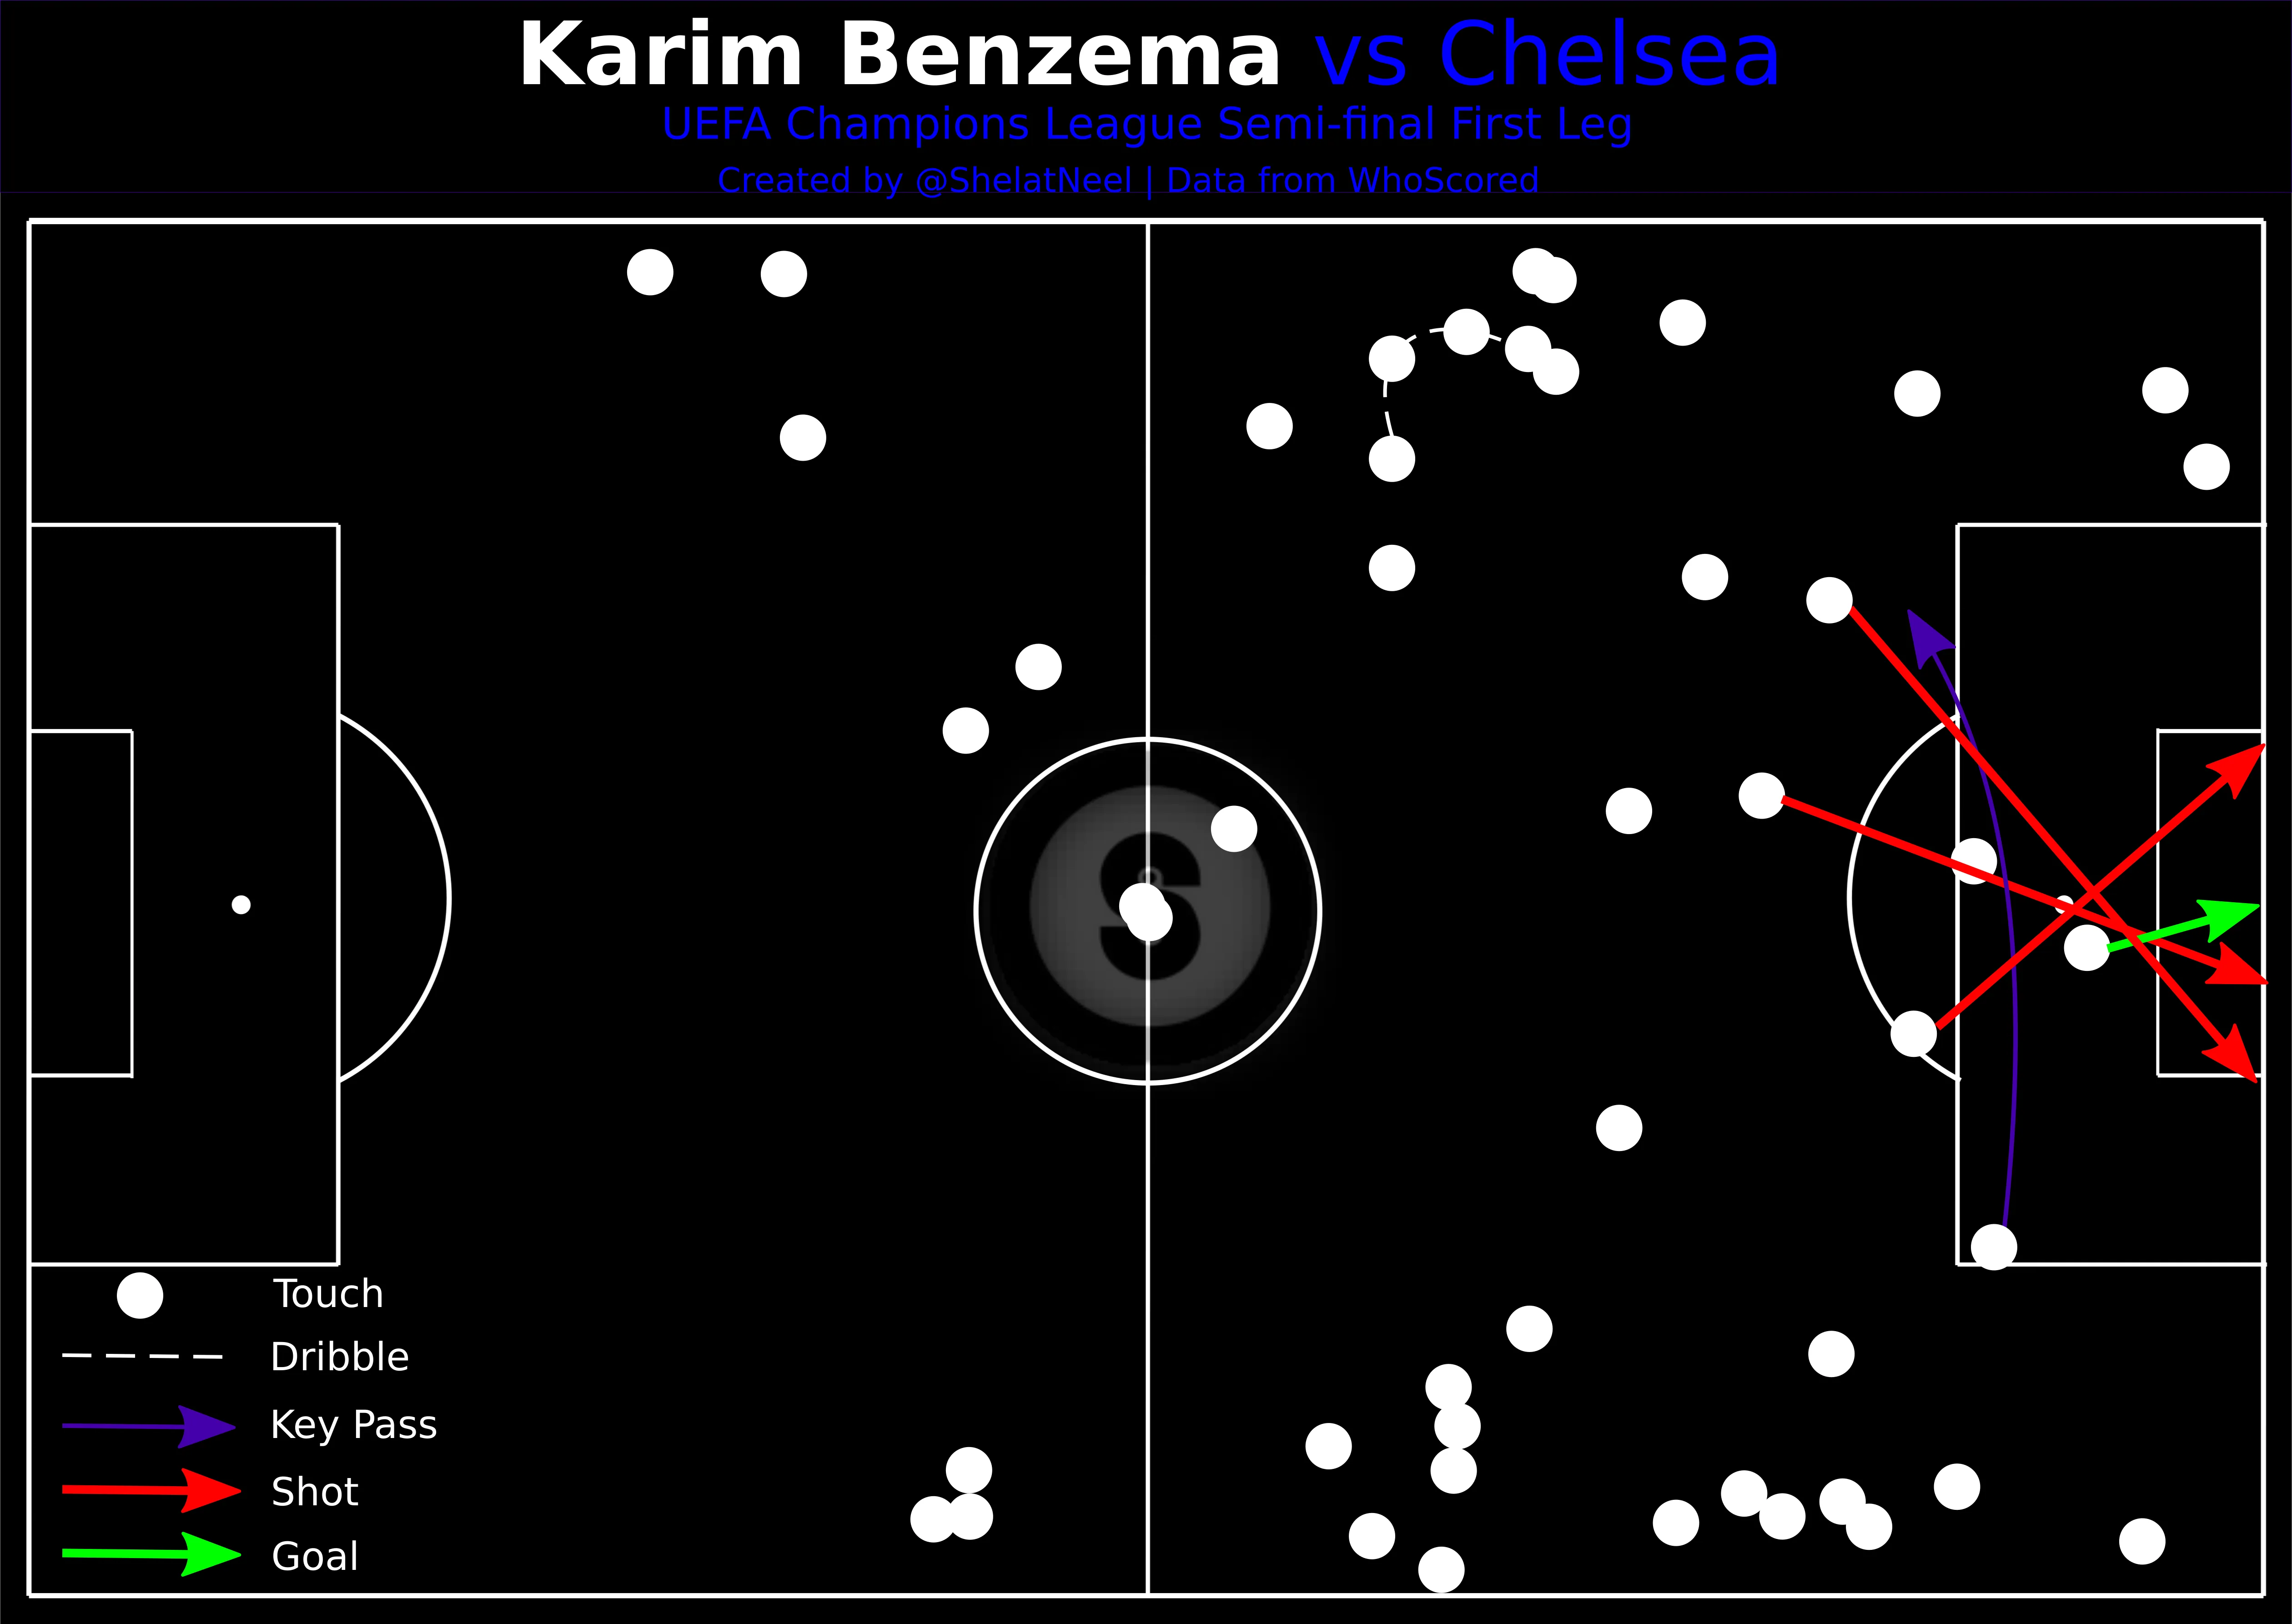
As his activity map from the match depicts, Benzema was almost everywhere with large clusters of touches on the wings and involvements in over half of his side’s nine attempts at goal.
The goal itself resulted from some individual brilliance by the French striker, although Chelsea cannot be too happy with their defending as they lost three aerial duels inside their own box. In either case, the goal was a superb improvised effort that not many would have minded to pull off.
Chelsea’s threat in transition
Although possession was distributed in a near-equal split, Chelsea looked a lot more threatening as they attempted 11 shots and racking up an xG of 1.77 to their opponents’ 0.69.
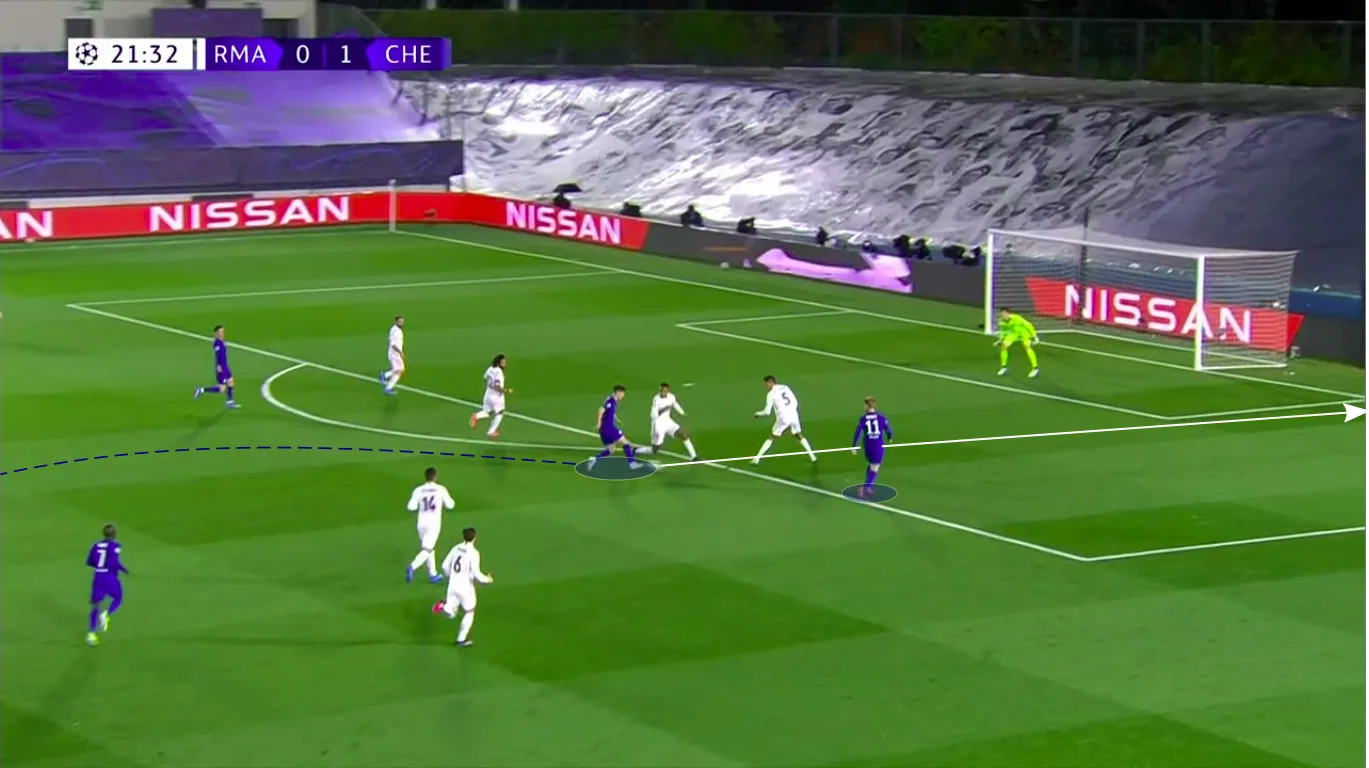
However, their chances did not come due to silky possession-play but were created at the end of quick transition attacks as Madrid committed a fair few bodies forward in attack, often leaving the centre-backs isolated.
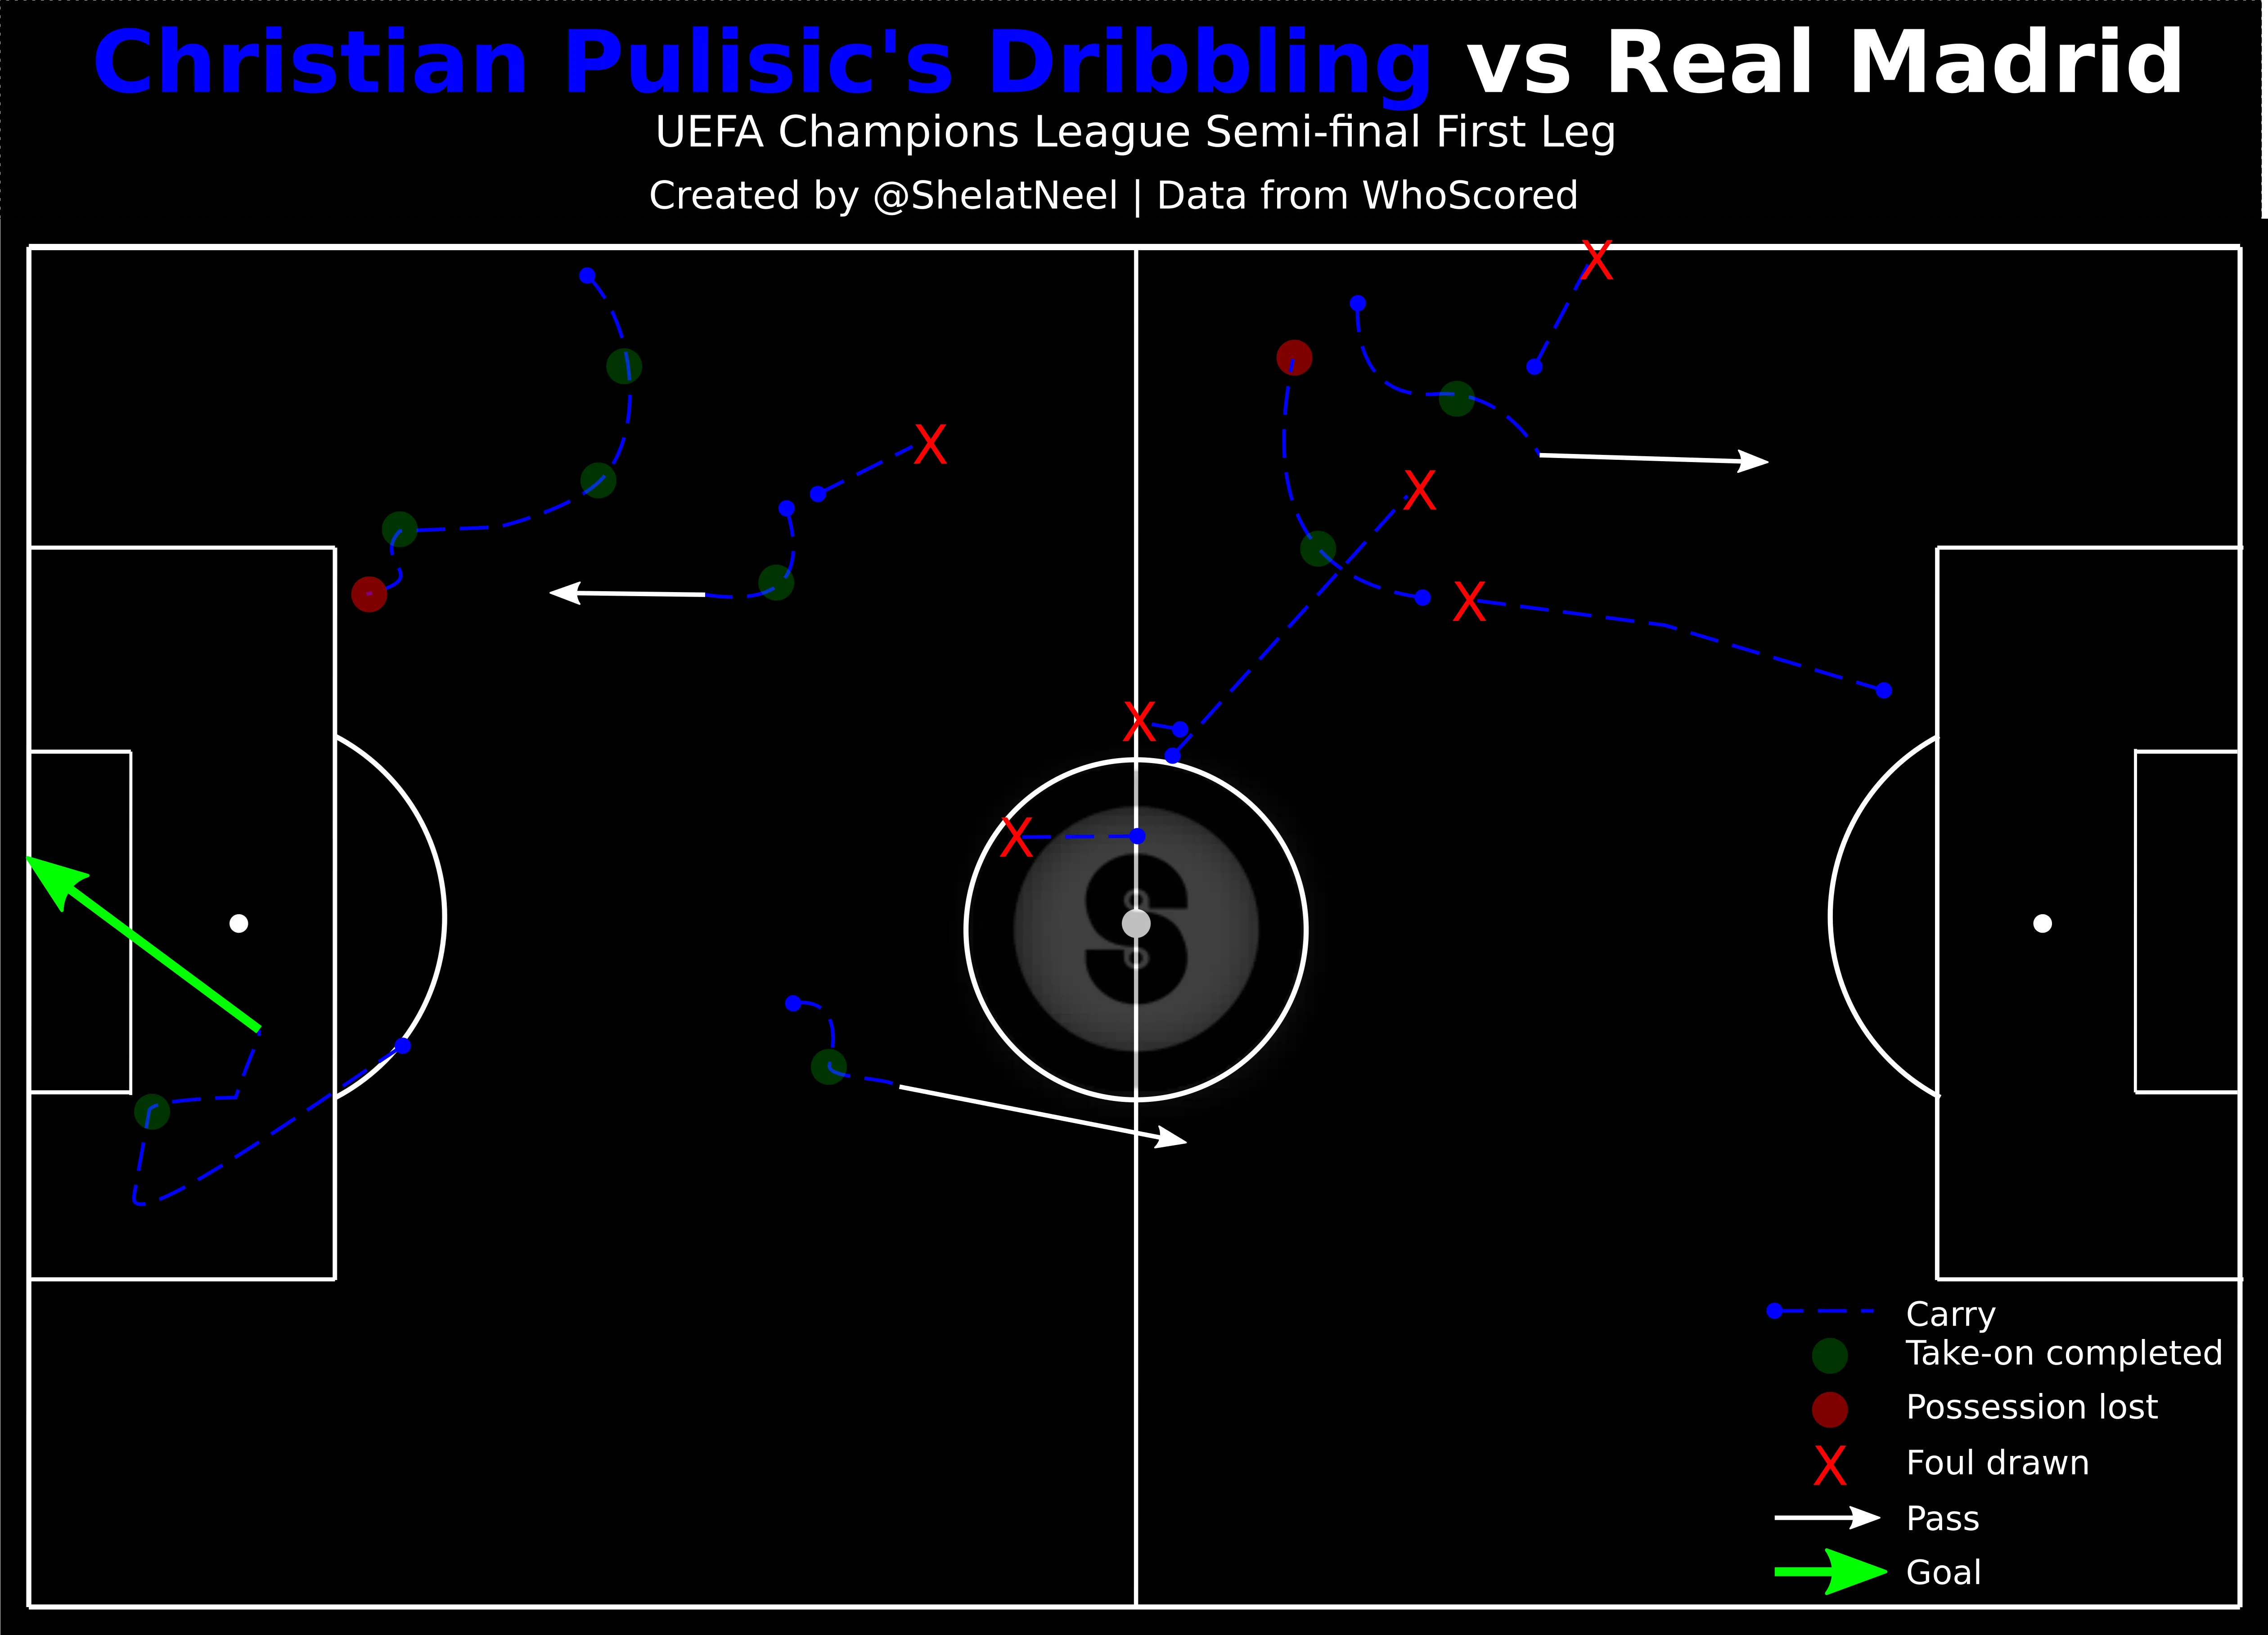
Pulisic proved to be a key player for this reason, as his individual quality was often relied upon for taking Chelsea forward, as the American international’s six fouls drawn and five dribbles were significantly greater than any other player on the pitch.
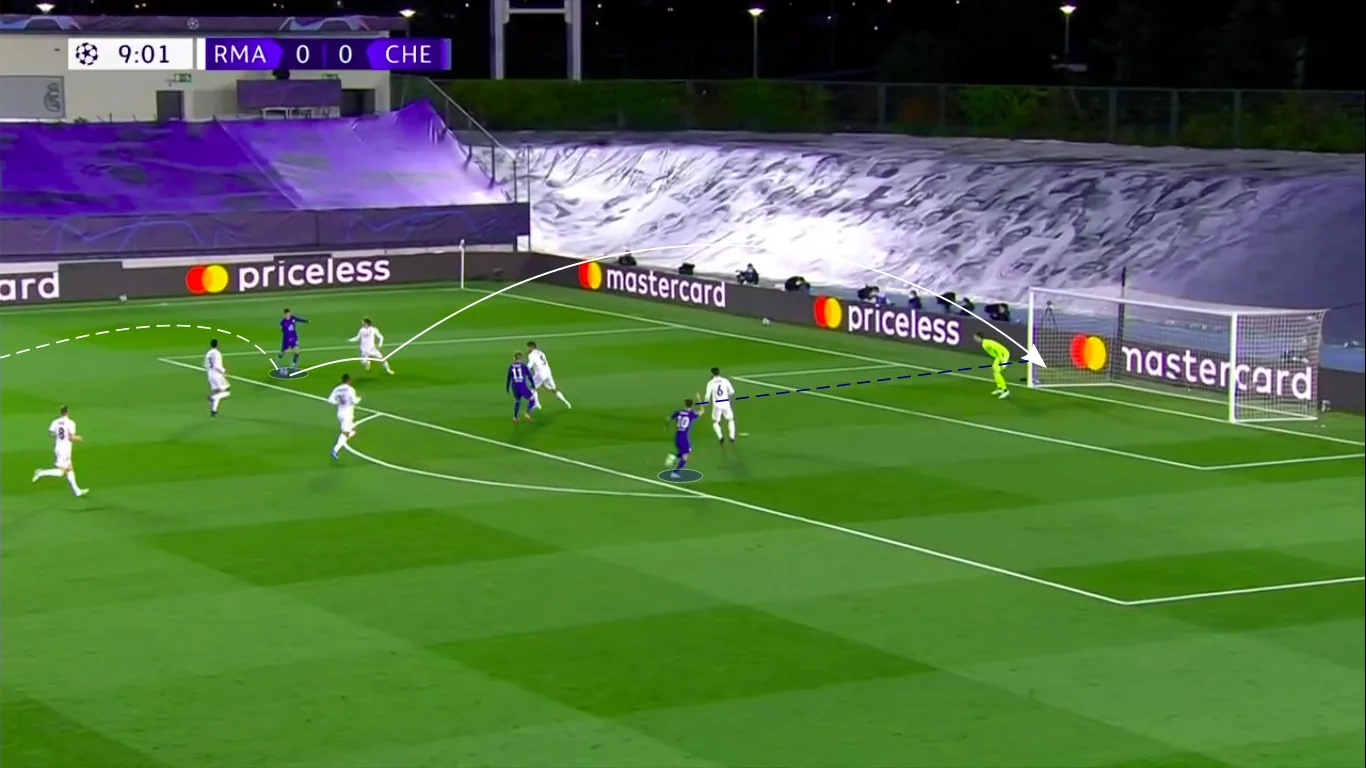
Mount helped too, as is the case in this scenario. He picked up the ball at the edge of his own defensive third after a turnover before driving forward at pace and evading Éder Militão.
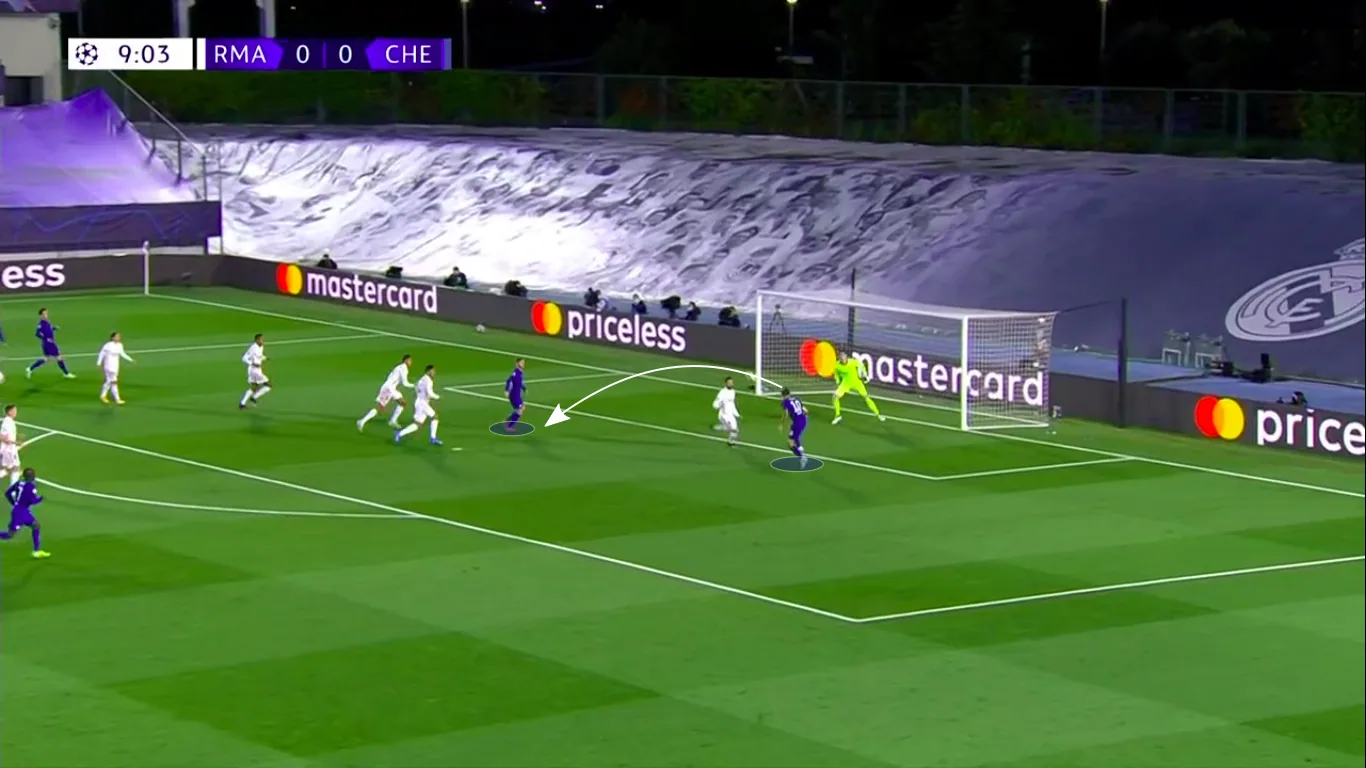
After entering the opposition box in a 3v3 scenario, Mount shaped up to shoot, but his effort was deflected by the retreating Modrić.
The ball only broke to Pulisic, though, and he headed it across to Werner. Madrid could do little to prevent this due to their lack of defenders in position, but the German striker let them off the hook by firing straight at Thibaut Courtois.
In most cases, though, Chelsea were wasteful from such positions.
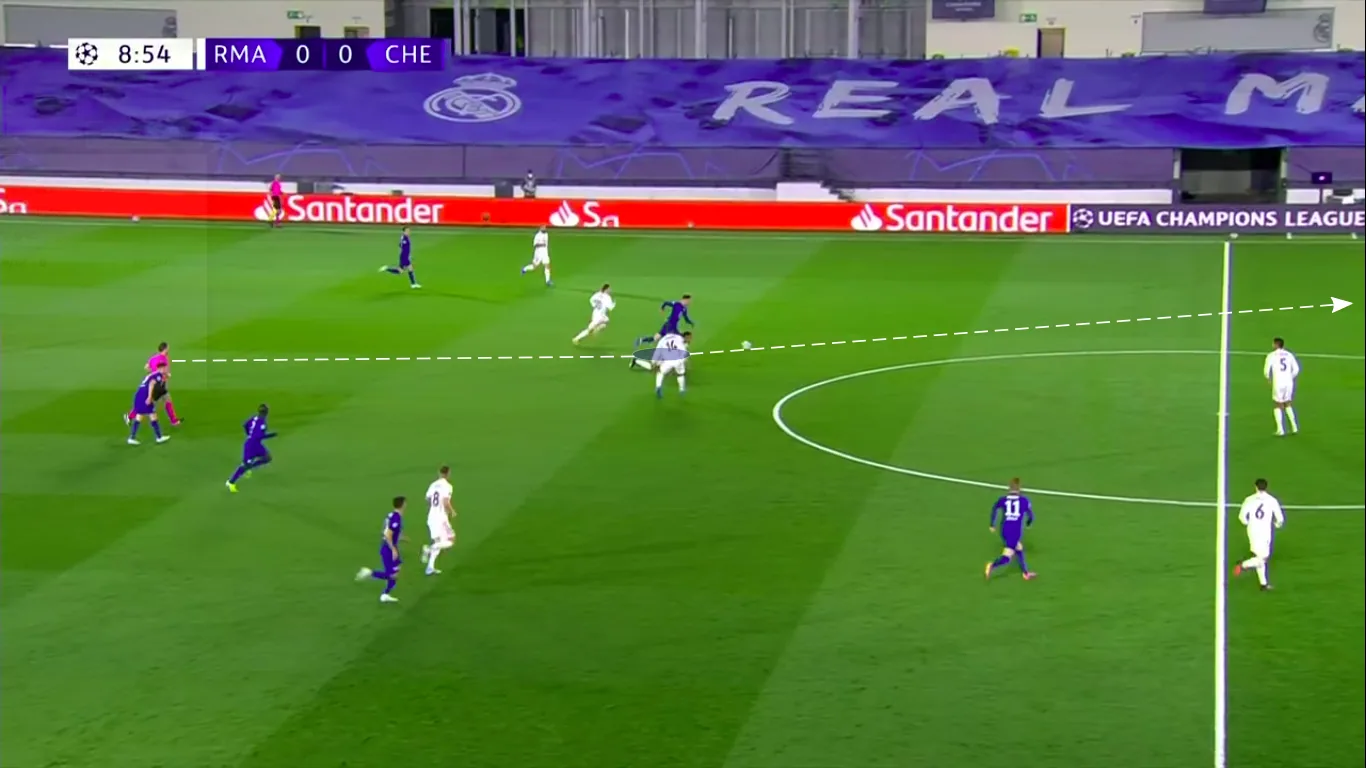
Here is a prime example of that – Pulisic carried the ball to the edge of the box from the halfway line while forcing the Madrid defence back in the process, but his final ball to Werner was overhit as the German striker failed to communicate and stopped his run, causing the attack to peter out.
There were many such scenarios of wastefulness from Chelsea in the first half, and although they cannot be reflected in the shooting statistics or xG, they were certainly huge chances missed.
Madrid were much more successful in preventing such scenarios in the second half when Casemiro was asked to be much more positionally disciplined and stay back.
This worked quite well, as Chelsea were restricted to four shots, three of which came from outside the box. However, as we discussed previously, Madrid could not do much with the ball themselves, which is why the second half was a stalemate.
Conclusion
Neither side will be satisfied with a 1-1 draw, but neither can complain too much.
Madrid did well given the number of key players they have out injured, especially defensively, but they unquestionably have a lot of work to do before the second leg in way of attack, which may even warrant a change in the system.
Benzema might have delivered this time, but he will certainly need some support next time around if Los Blancos are to progress to the final.
As for Chelsea, they will be pleased with the away goal they bagged from this match, but they will be ruing missed chances at the same time. They certainly could have added another goal, while the one they conceded was completely avoidable.
Yet, they now know that they do seem to be the better side qualitatively (albeit due to their opponents’ absentees) so that confidence could help them in the second leg.
That clash will take place in London next Wednesday, and it certainly promises to be another tactical feast on this evidence.
Stats courtesy WhoScored and Between The Posts.
Add Sportslens to your Google News Feed!
